
Friday, July 29, 2011

Tuesday, July 26, 2011
Uppercase Living FUN!!

New Dining Room Decal
A new addition to our dining room courtesy of Abby at Uppercase Living. We love it and can't wait to do more vinyl sayings, project, and artwork around the house! Check out her projects that she has done at her house here!

Monogram Artwork for Nursery
I also took a print that we had shoved away in a closet and gave it an up-do with some UpperCase Living decals. I took one of my many paint samples (Mineral from Bear) and painted over the martini glass and shaker. The martini and cocktails is not really the look we are going for in the nursery ;)


Wednesday, July 20, 2011
New Obsession: Pallet Furniture
I have a new love... Pallet Furniture! I ran across a pallet coffee table during my endless search for a new coffee table. There are so many neat things out there that people have created using pallets! Here are a few of my favorites...
(click on the photo to go the original link)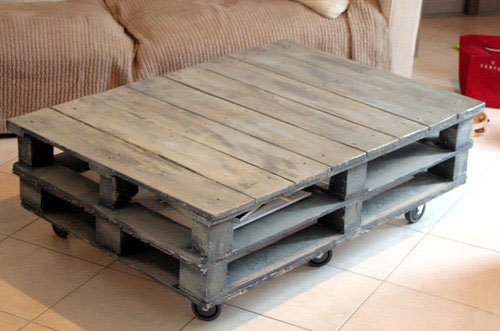 |
| Pallet Coffee Table |
 |
| Pallet Coffee Table |
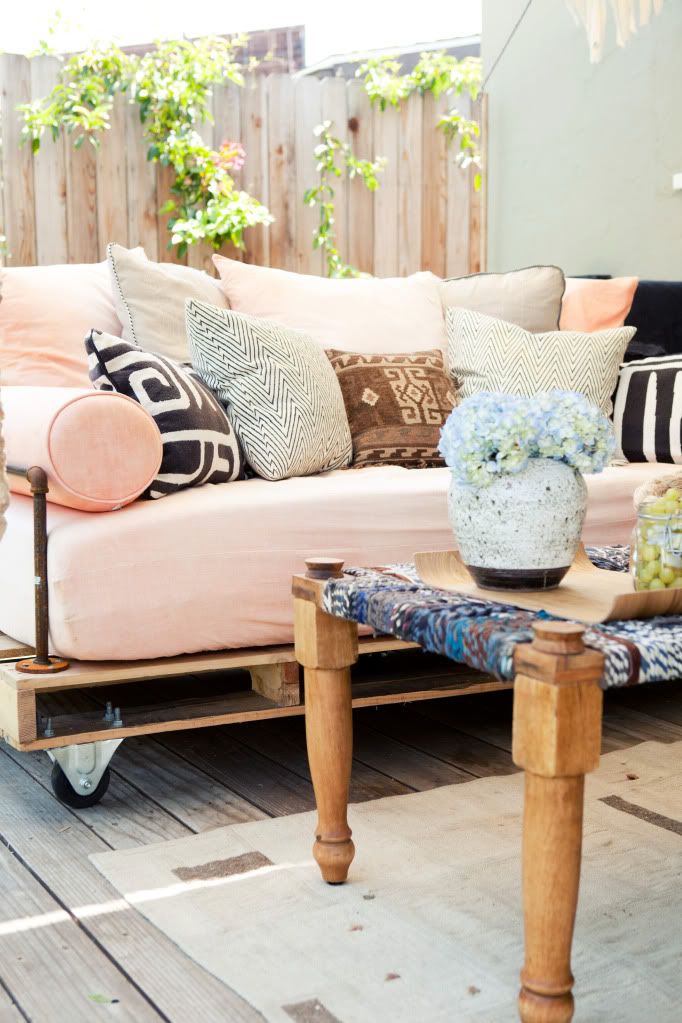 |
| Pallet Outdoor Couch |
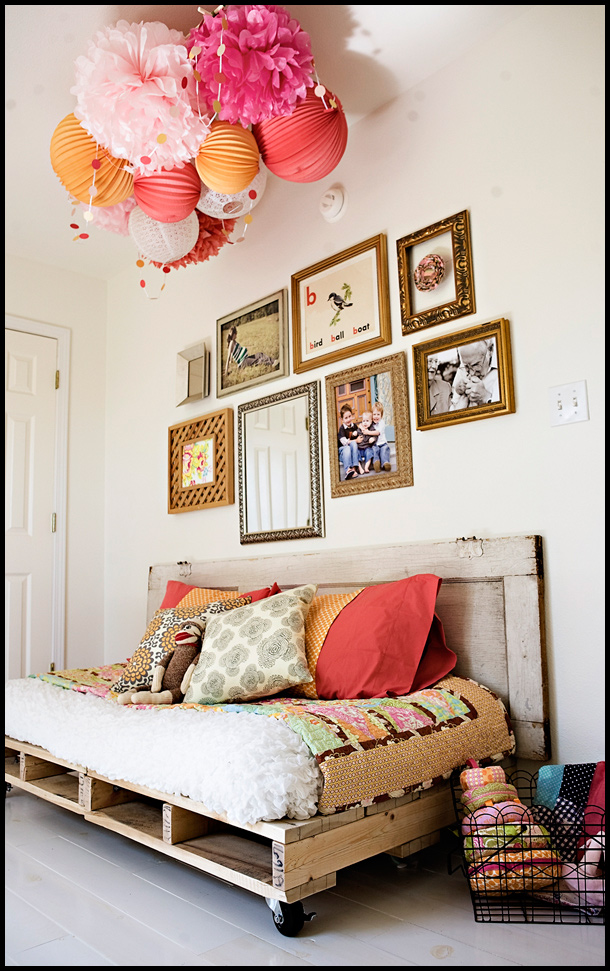 |
| Pallet Daybed with a Door Headboard |
 |
| Pallet Wine Shelf |
 |
| Pallet Bookshelves |
 |
| Pallet Coffee Table with Storage |
 |
| Pallet Photo Display w/ Hooks |
 |
| Pallet Children's Bed |
I might be rethinking my round coffee table... a pallet coffee table might have to fill in the void for now!
Monday, July 18, 2011
Who knew vinyl tiles could make me so happy? :)
A few months ago we had a not-so-great surprise under our kitchen sink. Unknown to us, our garbage disposal had a huge crack in it and was leaking water for a long a time. I finally noticed what was going on when I went to pull out the cleaning bucket to reorganize it. The bottom of the bucket was wet and grimy. When I looked into the cabinet, I noticed some ugly water damage. We replaced the garbage disposal but I have always been so bummed about the water damage left behind.
This is what we were left with (after it has been cleaned, bleached, and dried out for quite some time):

I saw a great idea on HGTV. I bought a few vinyl tiles at Home Depot and lined the bottom of the cabinet. They were easy to cut (score then snap apart) then firmly press to the cabinet. In the end, it not only hides the ugly water damage, but it also provides the cabinet with a waterproof lining (and it looks nice).

In all, it was a $6 fix! Love it!
This is what we were left with (after it has been cleaned, bleached, and dried out for quite some time):

 |
| Yucky Water Damage |
I saw a great idea on HGTV. I bought a few vinyl tiles at Home Depot and lined the bottom of the cabinet. They were easy to cut (score then snap apart) then firmly press to the cabinet. In the end, it not only hides the ugly water damage, but it also provides the cabinet with a waterproof lining (and it looks nice).
 |
| Peel and Stick Vinyl Tiles |

 |
| 20 minutes later....DONE! |
In all, it was a $6 fix! Love it!
 |
| What water damage?! |
I gave the extra tiles I bought to a friend. This was the photo she sent me from her phone! YAY! I am not the only one that loves these things :)
 |
| Nice job, Amanda! |
Saturday, July 16, 2011
The Task: ROUND COFFEE TABLE!
I want a UNIQUE round coffee table for our living room! The 2 key things...UNIQUE and ROUND! We have a sectional in our living room that we love but the table we have there right now (rectangular) does not fit. All of our tables downstairs (all of them) are rectangular....we need some shape in this place! :) I love this one from West Elm but it's too low.

I also like the iron/metal on coffee tables like these:

I love the top on this one but I think it would look neater with a thicker top.

I really love the looks of this one...just wish it was round. I love the color of the top.

I like it even better with wheels...

...if only it was ROUND.
So.. my task (well...our task).. is to MAKE our ideal ROUND and UNIQUE coffee table with all of these elements... or find one here soon ;) I am getting sick of trying to get around this rectangular thing! Wish us luck!
I also like the iron/metal on coffee tables like these:
I love the top on this one but I think it would look neater with a thicker top.
I really love the looks of this one...just wish it was round. I love the color of the top.
I like it even better with wheels...
...if only it was ROUND.
So.. my task (well...our task).. is to MAKE our ideal ROUND and UNIQUE coffee table with all of these elements... or find one here soon ;) I am getting sick of trying to get around this rectangular thing! Wish us luck!
Tuesday, July 12, 2011
Yep. It's another sign!
I can't get enough of these. They are so fun to make and even more fun to give to people! Here is one that I made for the wonderful woman, Grace, who helped with Baby W's nursery bedding. She is simply amazing in all ways!

Click here to see how to make one of these :)

Friday, July 8, 2011
Nursery Sneak Peek
Here is a quick sneak peek of Baby W's nursery. We are waiting for a few more things before I feel like we can call it "done" but here are some "in progress" photos:
 |
| The changing pad cover was made from a towel I loved, courtesy of our friend Grace. |
 |
| Pug Silhouettes (click here to see how I made them) |
Thursday, July 7, 2011
Pugs + Watermelon
Nothing says summer like WATERMELON and nothing is more hysterical to watch than 2 pugs gnawing on the rind! These were too cute not to share...
 |
| Winston licking his watermelon |
 |
| This has always been Porter's favorite food! |
 |
| Once he got the hang of it, he went to town! I wish this photo had a soundtrack to hear the snorting! |
 |
| It was a tad harder for Porter since he has had so many teeth pulled but he managed to work on his for quite a while. |
 |
| This is me attempting to take it away... I eventually won :) |
Tuesday, July 5, 2011
A VERY UNIQUE All-American Apple Pie
Before reading this... you must know that this pie is AMAZING! A friend of ours made it for us at a dinner party and I was SHOCKED to find out what was in it. I brought it to a BBQ for the 4th of July and it was a HIT! Here is the interesting part....this is a gluten-free, flour-less, sugar-less, no-bake apple pie! Crazy, right?! But I am not kidding you when I say you won't miss any of that stuff! It's that's good (and it's easy as pie to make)!


All-American Apple Pie
Recipe from:
Ani's Raw Food Kitchen: Easy, Delectable Living Foods Recipes
by: Ani Phyo
Almond Pie Crust
2 cups almonds, dry
1 teaspoon sea salt
2 cups pitted dates
Syrup
1/2 cup pitted dates
1 orange, peeled and seeded
Splash of water, as needed
Filling
5 cups apples, peeled, seeded thinly sliced, about 5 or 6 apples (have fun picking whichever types of apples you like for the filling)
1 cup rasins (optional)
2 tablespoons ground cinnamon
To make crust, pulse almonds and salt in food processor until nuts are in small pieces. You want your crust to have chunks of almonds in it, so don't overprocess. Use some of the finer powder to "flour" the bottom of your pie dish.
Slowly add dates into processor in small batches to mix with almond bits. the dates will bind the almonds to form a dough. Press dough into the bottom of "floured" pie pan. Set aside.
To make syrum, place orange into your blender first. Then add dates and blend. If needed, add small amounts of water to help everything mix well. Set aside.
To make filling, place sliced apples in a large bowl with raisins. Toss with cinnamon and syrum. Spoon filling into pie crust.
Will keep for two days in the fridge.

Saturday, July 2, 2011
What a Wrapping Mess!
Every time I go to wrap a gift, I am haunted by this box underneath the guest bed. Sure, it made sense when we lived in a very small compact house but now that we have closet space, there is no reason to hide this ugly, cramped, and unorganized wrapping paper box under a bed (notice my wonderful helpers in this project)!


My solution (thanks to my mother's idea) is to take a shelf in our linnen closet and turn it into a wrapping shelf.

All I needed were a few random supplies from the garage - a basket (I ended up using more than one), a hanger, and a few zip-ties.

I bent the hanger so that it would create a block for the rolls of wrapping paper so that they wouldn't roll off of the shelf. Then I used the zip-ties to hold the hanger in place. It's quite ugly so I made sure it wasn't visible from the doorway. My dad was the genius behind this clever fix in my mom's wrapping paper closet.

Now it was time to get organized! Using the baskets, I created a space for gift bags, jewelry boxes, and ribbon.


Wrapping gifts is now a much easier and accessible process in the Wilson house!
Subscribe to:
Posts (Atom)


